Google Cloud IoT Core

Posted on

1つのGCPプロジェクトで、Firebase functions / firestore と Cloud IoTを連携させてみる。 firesotreにIoTデバイスの設定を持って、その内容が更新されたら Cloud IoT 経由でデバイスに反映させる。

プロジェクトの作成と初期設定

GCPプロジェクトはfirebaseから作る。

 1
 2
 3
 4
 5
 6
 7
 8
 9
10
11
12
13
firebase projects:create "iot-trial-$(openssl rand -hex 3)"
? What would you like to call your project? (defaults to your project ID)
✔ Creating Google Cloud Platform project
✔ Adding Firebase resources to Google Cloud Platform project

🎉🎉🎉 Your Firebase project is ready! 🎉🎉🎉

Project information:
   - Project ID: iot-trial-xxxxxx
   - Project Name: iot-trial-xxxxxx

Firebase console is available at
https://console.firebase.google.com/project/iot-trial-xxxxxx/overview

gcloudコマンドを設定する。

1
2
3
4
gcloud config configurations create iot-trial
gcloud config set project iot-trial-xxxxxx
gcloud config set account john.due@example.com
gcloud config configurations activate iot-trial

ついでに環境変数も設定しておく。

1
2
3
export REGISTRY_ID=keys
export CLOUD_REGION=asia-east1
export GCLOUD_PROJECT="iot-trial-xxxxxx"

請求アカウントの紐付け

Cloud IoTで請求アカウントが必要になるので、リンクする。

まず、請求アカウントの確認。

1
2
3
4
gcloud alpha billing accounts list
ACCOUNT_ID            NAME                             OPEN  MASTER_ACCOUNT_ID
xxxxxx-xxxxxx-xxxxxx  CREDIT CARD                      True
xxxxxx-xxxxxx-xxxxxx  Billing Account for API Project

プロジェクトに紐付ける。

1
2
3
4
5
gcloud alpha billing projects link iot-trial-xxxxxx --billing-account=xxxxxx-xxxxxx-xxxxxx
billingAccountName: billingAccounts/xxxxxx-xxxxxx-xxxxxx
billingEnabled: true
name: projects/iot-trial-xxxxxx/billingInfo
projectId: iot-trial-xxxxxx

デバイスレジストリの作成

の前に、pubsubのトピックを作っておく。

1
2
gcloud pubsub topics create device-events
Created topic

レジストリを作る。プロジェクト内で Cloud IoT が有効になっていないときは、以下のように一度有効にして良いか確認してくる。

 1
 2
 3
 4
 5
 6
 7
 8
 9
10
gcloud iot registries create $REGISTRY_ID --region=$CLOUD_REGION --event-notification-config=subfolder="",topic=device-events
API [cloudiot.googleapis.com] not enabled on project [999999999999].
Would you like to enable and retry (this will take a few minutes)?
(y/N)?  y

Enabling service [cloudiot.googleapis.com] on project [999999999999]...
Waiting for async operation operations/acf.c2945322-371e-4c6a-a985-518f9bbe0995 to complete...
Operation finished successfully. The following command can describe the Operation details:
 gcloud services operations describe operations/tmo-acf.c2945322-371e-4c6a-a985-518f9bbe0995
Created registry [keys].

firestoreのデータ更新をハンドリングする処理を書く

functionsが使えるように firebase init functions を実行。以下のように設定。

  • ? Please select an option: Use an existing project
  • ? Select a default Firebase project for this directory: iot-trial-xxxxxx (iot-trial-xxxxxx)
  • ? What language would you like to use to write Cloud Functions?: TypeScript
  • ? Do you want to use TSLint to catch probable bugs and enforce style?: (default)
  • ? Do you want to install dependencies with npm now?: (default)

Firebase functionsの設定する。

1
firebase functions:config:set iot.core.region=$CLOUD_REGION iot.core.registry=$REGISTRY_ID

functions/src/index.ts に処理を書く。

 1
 2
 3
 4
 5
 6
 7
 8
 9
10
11
12
13
14
15
16
17
18
19
20
21
22
23
24
25
26
27
28
29
30
31
32
33
34
import cbor = require('cbor');

import * as admin from 'firebase-admin';
import * as functions from 'firebase-functions';
const iot = require('@google-cloud/iot');
const client = new iot.v1.DeviceManagerClient();

exports configUpdate = functions.firestore
  .document('device-configs/{deviceId}')
  .onWrite(async (change: functions.Change<admin.firestore.DocumentSnapshot>, context?: functions.EventContext) => {
    if (context) {
      console.log(context.params.deviceId);
      const request = generateRequest(context.params.deviceId, change.after.data(), false);
      return client.modifyCloudToDeviceConfig(request);
    } else {
      throw(Error('no context from trigger'));
    }
  });


function generateRequest(deviceId:string, configData:any, isBinary:Boolean) {
  const formattedName = client.devicePath(process.env.GCLOUD_PROJECT, functions.config().iot.core.region, functions.config().iot.core.registry, deviceId);
  let dataValue;
  if (isBinary) {
    const encoded = cbor.encode(configData);
    dataValue = encoded.toString('base64');
  } else {
    dataValue = Buffer.from(JSON.stringify(configData)).toString('base64');
  }
  return {
    name: formattedName,
    binaryData: dataValue
  };
}

書けたらデプロイ。

1
2
3
4
cd functions
npm install @types/cbor cbor @google-cloud/iot --save
cd ..
firebase deploy --only functions

こんなエラーが出たら functions/package.jsonengines.node の値を確認する。

function failed on loading user code. Error message: Code in file lib/index.js can’t be loaded. Is there a syntax error in your code? Detailed stack trace: Error: Node.js v10.0.0 is a minimum requirement. To learn about legacy version support visit: https://github.com/googleapis/google-cloud-node#supported-nodejs-versions

engines.node の値を 10 にする。

1
2
3
4
5
6
7
{
  ...
  "engines": {
    "node": "10"
  },
  ...
}

Cloud IoT のレジストリにデバイスを登録する

鍵ペアを作る。デバイスは、秘密鍵でJWTトークンを暗号化して、Cloud IoTが公開鍵を使って復号化する。公開鍵はCloud IoTに登録して、秘密鍵はデバイスが持つ。秘密鍵は漏れないように、どうにかする。

1
2
openssl genpkey -algorithm RSA -out rsa_private.pem -pkeyopt rsa_keygen_bits:2048
openssl rsa -in rsa_private.pem -pubout -out rsa_public.pem

デバイスを登録する。

1
gcloud iot devices create sample-device --region $CLOUD_REGION --registry $REGISTRY_ID --public-key path=rsa_public.pem,type=rsa-pem

firestore にデータを登録する。

Firebase consoleを開いて、

  1. 「Database」→「データベースの作成」
  2. 「本番環境で開始」→「次へ」
  3. 「nam5 (us-centeral)」→「完了」

ルールを更新。なんでもありにする。

1
2
3
4
5
6
7
8
rules_version = '2';
service cloud.firestore {
  match /databases/{database}/documents {
    match /{document=**} {
      allow read, write: if true;
    }
  }
}

新しいデータセットを定義する

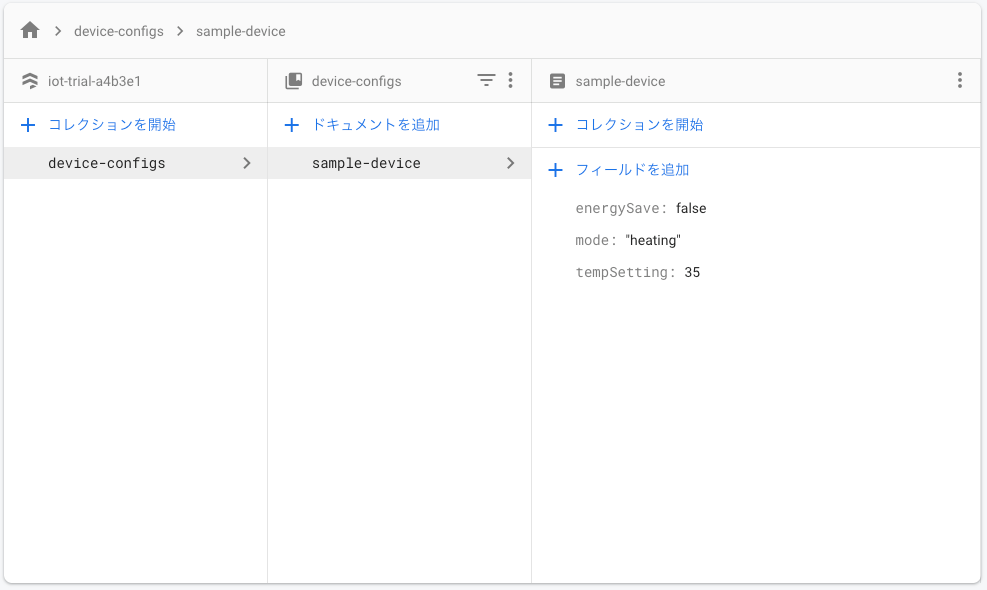
  • Collection ID: device-configs
    • Document ID: sample-device
      • mode (string): heating
      • tempSetting (number): 35
      • energySave (boolean): false

firebaseのコンソールで見るとこんな感じ。

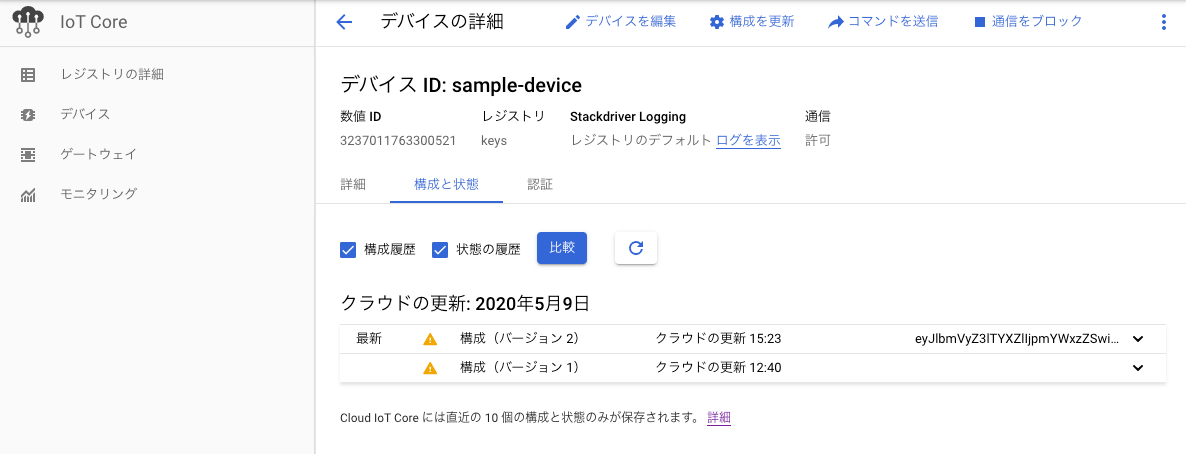
データを保存すると、Functionsの configUpdate がトリガーされて、デバイスに反映される。

Cloud Console から、IoT Coreのコンソールを開をいて、「デバイス」→ sample_device を選択。「構成と状態」に「構成(バージョン 2)」があることを確認する。

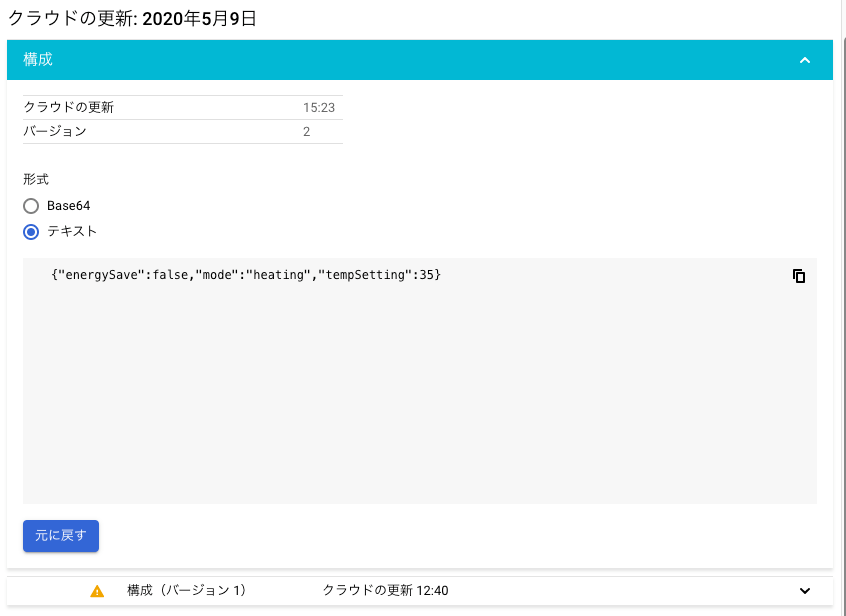
「構成(バージョン 2)」をクリック、「テキスト」を選択すると、firestoreに入れたデータが反映されていることが分かる。

デバイスに反映されるか確認する

デバイス側は、MQTTでサブスクライブする。

こちらを参考に要らないところを消してシンプルにしてみた。あと、依存ライブラリはこちら

修正したコードは、こちら。

  1
  2
  3
  4
  5
  6
  7
  8
  9
 10
 11
 12
 13
 14
 15
 16
 17
 18
 19
 20
 21
 22
 23
 24
 25
 26
 27
 28
 29
 30
 31
 32
 33
 34
 35
 36
 37
 38
 39
 40
 41
 42
 43
 44
 45
 46
 47
 48
 49
 50
 51
 52
 53
 54
 55
 56
 57
 58
 59
 60
 61
 62
 63
 64
 65
 66
 67
 68
 69
 70
 71
 72
 73
 74
 75
 76
 77
 78
 79
 80
 81
 82
 83
 84
 85
 86
 87
 88
 89
 90
 91
 92
 93
 94
 95
 96
 97
 98
 99
100
101
102
103
104
105
106
107
108
109
110
111
112
113
114
115
116
117
118
119
120
121
122
123
124
125
126
127
128
129
130
131
132
133
134
135
136
137
138
139
140
141
142
143
144
145
146
147
148
149
150
151
152
153
154
155
156
157
158
159
160
161
162
163
164
165
166
167
168
169
170
171
172
173
174
175
176
177
178
179
180
181
182
183
184
import argparse
import datetime
import logging
import os
import random
import ssl
import time

import jwt
import paho.mqtt.client as mqtt

logging.getLogger('googleapiclient.discovery_cache').setLevel(logging.CRITICAL)

# The initial backoff time after a disconnection occurs, in seconds.
minimum_backoff_time = 1

# The maximum backoff time before giving up, in seconds.
MAXIMUM_BACKOFF_TIME = 32

# Whether to wait with exponential backoff before publishing.
should_backoff = False

CA_CERTS = 'roots.pem'
HOST = 'mqtt.googleapis.com'
PORT = 8883
JWT_EXPIRE = 20
ALGORITHM = 'RS256'


def create_jwt(project_id, private_key_file, algorithm, expire_minutes):
    print('Creating JWT using {} from private key file {}'.format(
            algorithm, private_key_file))
    token = {
            'iat': datetime.datetime.utcnow(),
            'exp': datetime.datetime.utcnow() + datetime.timedelta(
                minutes=expire_minutes),
            'aud': project_id
            }
    with open(private_key_file, 'r') as f:
        private_key = f.read()
    return jwt.encode(token, private_key, algorithm=algorithm)


def error_str(rc):
    """Convert a Paho error to a human readable string."""
    return '{}: {}'.format(rc, mqtt.error_string(rc))


def on_connect(unused_client, unused_userdata, unused_flags, rc):
    print('on_connect', mqtt.connack_string(rc))

    # After a successful connect, reset backoff time and stop backing off.
    global should_backoff
    global minimum_backoff_time
    should_backoff = False
    minimum_backoff_time = 1


def on_disconnect(unused_client, unused_userdata, rc):
    print('on_disconnect', error_str(rc))

    # Since a disconnect occurred, the next loop iteration will wait with
    # exponential backoff.
    global should_backoff
    should_backoff = True


def get_client(
        jwt, project_id, cloud_region, registry_id, device_id,
        hostname, port):
    client_id = 'projects/{}/locations/{}/registries/{}/devices/{}'.format(
            project_id, cloud_region, registry_id, device_id)
    print('Device client_id is \'{}\''.format(client_id))

    client = mqtt.Client(client_id=client_id)
    client.username_pw_set(username='unused', password=jwt)
    client.tls_set(ca_certs=CA_CERTS, tls_version=ssl.PROTOCOL_TLSv1_2)
    client.on_connect = on_connect
    client.on_disconnect = on_disconnect
    client.on_publish = lambda client, userdata, mid: print('on_publish')
    client.on_message = lambda client, userdata, message: print(
            'Received message \'{}\' on topic \'{}\' with Qos {}'.format(
                str(message.payload.decode('utf-8')),
                message.topic, str(message.qos)))

    client.connect(hostname, port)

    mqtt_config_topic = '/devices/{}/config'.format(device_id)
    client.subscribe(mqtt_config_topic, qos=1)

    mqtt_command_topic = '/devices/{}/commands/#'.format(device_id)
    client.subscribe(mqtt_command_topic, qos=0)

    return client


def mqtt_device_demo(
        project_id, cloud_region, registry_id, device_id,
        server, server_port,
        private_key_file, algorithm, jwt_expires_minutes):
    global minimum_backoff_time
    global MAXIMUM_BACKOFF_TIME

    jwt_iat = datetime.datetime.utcnow()
    jwt_exp_mins = jwt_expires_minutes
    jwt = create_jwt(project_id, private_key_file, algorithm, jwt_exp_mins)
    client = get_client(
            jwt, project_id, cloud_region, registry_id, device_id,
            server, server_port)

    while True:
        # Process network events.
        client.loop()

        # Wait if backoff is required.
        if should_backoff:
            # If backoff time is too large, give up.
            if minimum_backoff_time > MAXIMUM_BACKOFF_TIME:
                print('Exceeded maximum backoff time. Giving up.')
                break

            # Otherwise, wait and connect again.
            delay = minimum_backoff_time + random.randint(0, 1000) / 1000.0
            print('Waiting for {} before reconnecting.'.format(delay))
            time.sleep(delay)
            minimum_backoff_time *= 2
            client.connect(server, server_port)

        seconds_since_issue = (datetime.datetime.utcnow() - jwt_iat).seconds
        if seconds_since_issue > 60 * jwt_exp_mins:
            print('Refreshing token after {}s'.format(seconds_since_issue))
            client.loop()
            client.disconnect()
            jwt_iat = datetime.datetime.utcnow()
            jwt = create_jwt(
                    project_id, private_key_file, algorithm, jwt_exp_mins)
            client = get_client(
                    jwt, project_id, cloud_region, registry_id, device_id,
                    server, server_port)

        for i in range(0, 60):
            time.sleep(1)
            client.loop()


def parse_command_line_args():
    """Parse command line arguments."""
    parser = argparse.ArgumentParser(description=(
            'Example Google Cloud IoT Core MQTT device connection code.'))
    parser.add_argument(
            '--cloud_region', default='us-central1', help='GCP cloud region')
    parser.add_argument(
            '--device_id', required=True, help='Cloud IoT Core device id')
    parser.add_argument(
            '--num_messages',
            type=int,
            default=100,
            help='Number of messages to publish.')
    parser.add_argument(
            '--private_key_file',
            required=True,
            help='Path to private key file.')
    parser.add_argument(
            '--project_id',
            default=os.environ.get('GOOGLE_CLOUD_PROJECT'),
            help='GCP cloud project name')
    parser.add_argument(
            '--registry_id', required=True, help='Cloud IoT Core registry id')

    return parser.parse_args()


def main():
    args = parse_command_line_args()
    mqtt_device_demo(
            args.project_id, args.cloud_region,
            args.registry_id, args.device_id,
            HOST, PORT,
            args.private_key_file, ALGORITHM, JWT_EXPIRE)
    print('Finished.')


if __name__ == '__main__':
    main()

実行してみる。

まず、証明書をダウンロードしておく。

1
curl -Ol https://pki.goog/roots.pem

デバイスの鍵ファイル(秘密鍵のほう)も必要なので忘れずに。

pythonを整える。

1
2
3
4
5
curl -Ol https://raw.githubusercontent.com/GoogleCloudPlatform/python-docs-samples/master/iot/api-client/mqtt_example/requirements.txt
python3 -m venv venv
source venv/bin/activate
pip install --upgrade pip
pip install -r requirements.txt

カレントディレクトリは、こんな感じ。

1
2
3
4
5
6
7
ls -1
cloudiot_mqtt_example.py
requirements.txt
roots.pem
rsa_private.pem
rsa_public.pem
venv

実行する。

1
python3 cloudiot_mqtt_example.py --cloud_region $CLOUD_REGION --device_id sample-device --private_key_file rsa_private.pem --project_id $GCLOUD_PROJECT --registry_id keys

実行したまま、firestoreのデータを更新すると、ログが流れる。

1
Received message '{"energySave":false,"mode":"heating","tempSetting":18}' on topic '/devices/sample-device/config' with Qos 1